Computatest
High Pressure and Temperature Surveys
Bourdon Tubes and Hysteresis
Introduction to Bourdon Tubes
1.1 Bourdon Tubes
The deflection of a bourdon tube varies with the ratio of its major to minor cross-sectional axis, tube length, difference between the internal and external pressures, radius of curvature, and angle of twist. It also varies inversely with the tube-wall thickness and the modulus of elasticity of the material used.
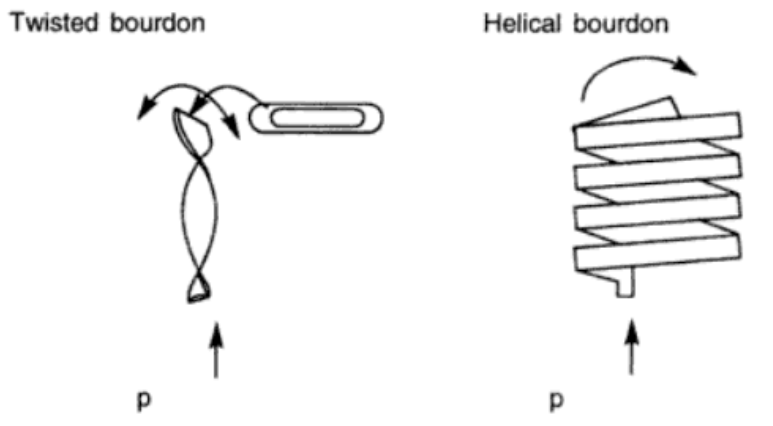
The angular deflection of the helical-type and C-type bourdon tubes can be expressed by the equation.
where θ = angle of rotation of the tip of the tube. θ0 = angle of tube/total angle of helix, p = pressure in pascals, r = radius of the tube/helix in meters, t = wall thickness in meters, E = Young's modulus of material in pascals, and b = minor axis of the tube, measured from the middle of one wall to the middle of the other wall, in meters.
Bourdon tubes are almost invariably fabricated with metal alloys, such as cold-worked brass, phosphor bronze, beryllium copper, stainless steel, and nickel alloys. Ni-SPAN-C is a popular material owing to its negligible variation in modulus of elasticity with temperature. Helical bourdon tubes made of fused quartz having very low hysteresis, creep, and fatigue are widely used as secondary standards. Bourdon tubes are more sensitive to shock and vibrations than diaphragms, and are therefore used mostly for static measurements. The range covered varies from 106 to 108 pascals.
Pressure Ranges and Other Characteristics of the Different Bourdon Tube Materials
(1 PSI = 6.9 kPa = 0.069 bars)
| Tube Material | Corrosion | Spring Rate | Temp. Coefficient | Hysteresis | Maximum Pressure |
| Phosphor bronze | P | F | P | F | 800 PSIG |
| Beryllium copper | P | G | P | G | 5000 PSIG |
| 316 Stainless steel | G | P | P | P | 10,000 PSIG |
| 403 Stainless steel | G | P | P | P | 20,000 PSIG |
| Ni-SPAN-C | G | G | G | G | 22,000 PSIG |
| K-Monel | G | P | P | P | 20,000 PSIG |
| P = poor F = fair G = good | |||||
1.2 Bellows
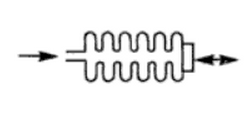
Bellows are thin-walled cylindrical shells with deep convolutions, and are sealed at one end. The sealed end moves axially when pressure is applied to the other end, as shown in Fig. 1.2. The number of convolutions varies from 5 to 20 depending upon the pressure range, displacement required, and operating temperature. The stiffness is proportional to Young's modulus of the material, and is inversely proportional to the outside diameter and to the number of convolutions of the bellow. The deflection y of the bellows can be expressed by the equation,
where t = wall thickness, n = number of convolutions, E = modulus of elasticity, Rx = average radius of the bellows, and AQ= effective area of the bellows. Bellows are normally used for low-pressure measurements requiring large stroke lengths. They are sensitive to vibrations. In certain applications, the bellows can be furnished with a restraining spring which opposes their axial deflection. This allows their usage for extended pressure ranges with increased life. The materials used for the fabrication are phosphor bronze, beryllium copper, stainless steel, or nickel alloys.
1.3 Helical shape bourdon tube
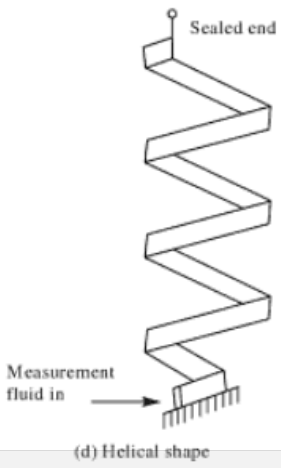
Helical type design is similar to spiral type but is more robust. The tip displacement for this
is longer than that of spiral type. This design is applicable for higher ranges of pressure. Its over-range capability is extremely high due to its robustness.
Due to higher volumetric space available with the helical shape, the internal space functions as a capacitive chamber. If the fluid pressure under measurement
is fluctuating, this design absorbs entire fluctuations and will result in stable tip movement.
The number of turns of the helix is selected depending upon the magnitude of pressure to be measured. The accuracy of this design ranges from ±0.5% to ±1%
using standard calibration and maintenance techniques. With a more accurate mathematical model this can be considerably improved.
In general, material of construction selected depends upon the type of measurement fluid as well as range of pressure to be measured. For non-corrosive atmosphere and
low-pressure application phosphor bronze and beryllium copper are used. For corrosive atmosphere and high-pressure application, stainless steel, Monel, or
Ni-SPAN-C
are used.
The hysteresis-loop area is equal to deformation work produced during one loading cycle. This deformation work is mainly transformed into heat energy, and a very small part of it into stored energy. The total hysteresis energy is then equal to the sum of areas of all hysteresis loops. If we neglect the (usually short) hardening/softening period during which the loop area undergoes changes, the total energy can be expressed as the product of the area of the saturation hysteresis loop and the number of cycles to fracture. This has been utilized in some energy-based theories of the fatigue process, and thence the area of the stable hysteresis loop becomes an important quantity. The hysteresis-loop area can be generally expressed as
This area depends on the hysteresis-loop shape (via the function σ=σ(εp)) and on the stress—and plastic—strain amplitudes, which are here limits of integration. Specific expressions for the loop area are then given by the choice of the stress-strain relation along the hysteresis loop.
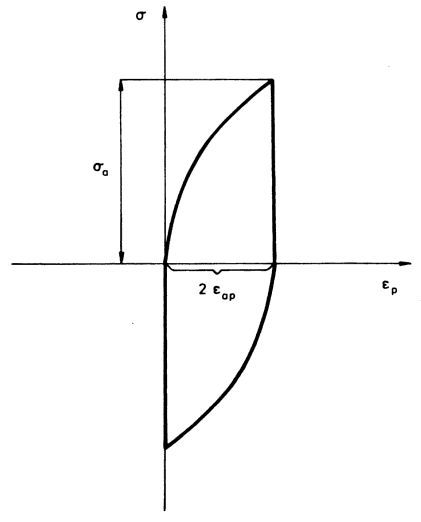
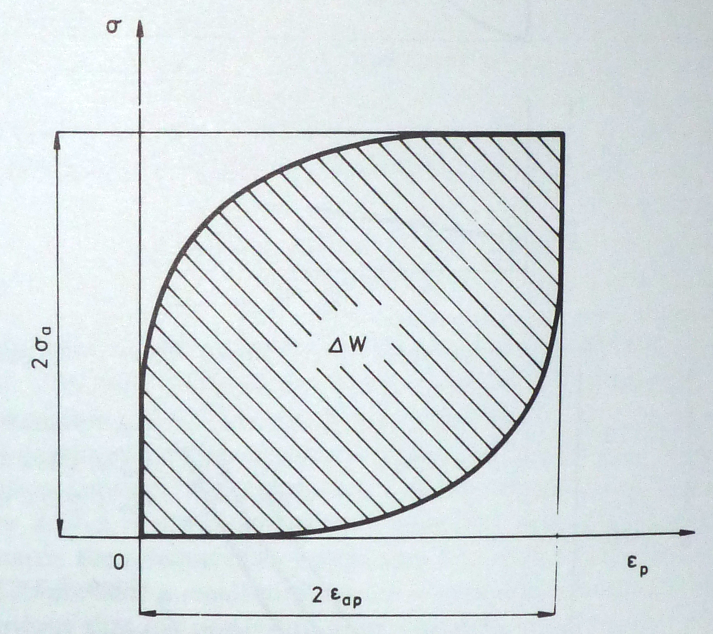
Feltner and Morrow approximated the loop as shown in Fig. 2.16. This approximation assumes that (i) the half width of the loop is equal to the plastic-strain amplitude and (ii) the tensile part of the loop can be described by a power-law dependence of the type
The constant k in this equation can be expressed using the boundary condition σ=σa, for ε=2εap as k=2εap/. Equation 2.2 can then be written in the form
The hysteresis-loop area is then (Fig. 2.16)
After integration we obtain
This hysteresis-loop area can be expressed alternatively as a function of stress amplitude (by applying the equation for constant k) in the form
The
assumptions used in this derivation are only rough approximations of
experimental findings. The half width of the hysteresis loop is always lower
than the plastic-strain amplitude. This difference is not important for
high-amplitude cycling, but may be dominant for low-amplitude cycling. Figure
2.17 shows how far the power-law relation between stress and plastic strain
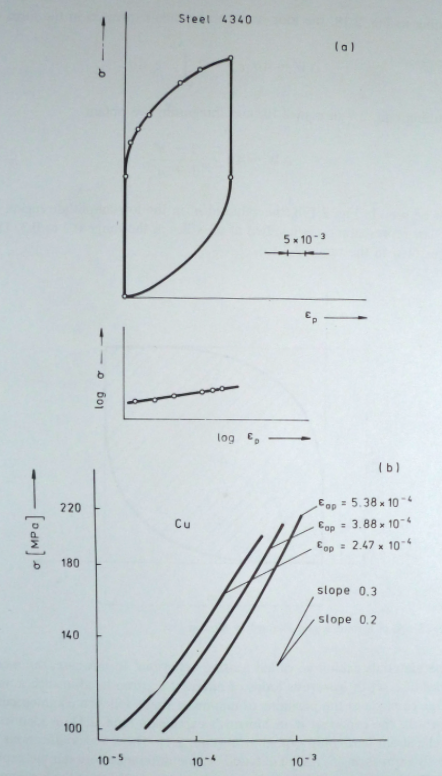
along the hysteresis loop is justified. Figure 2.17a is a typical example from the high-amplitude region. In log-log coordinates, the
relation is a straight line, i. e. here the relation is a power law. Figure
2.17b presents a result in the same coordinates for the low-amplitude region.
It is obvious that the power-law approximation is no longer valid.
Morrow also assumes the power-law stress-strain relation, expressed in his paper as:
… but does not identify a priori half width of the loop with the plastic-strain amplitude. Applying the boundary conditions according to Fig. 2.18, σ=σa, for εp=2εap we get from eqn. 2.7
According to Fig. 2.18, the loop area can be then expressed in the form
Substituting eqn. 2.8 in eqn. 2.9, and integrating we obtain
As can be seen in Fig. 2.17b, the value of n" in the low-amplitude region—if the power-law representation is justified at all—lies in the range 0.2 to 0.3. The loop area lies then in the range 2.2 to 2.7.
Some materials exhibit so-called Masing behaviour. In this case, the ascending branches of a set of hysteresis loops of different εap, translated in such a way that their tips coincide at the positions of minimum stress, follow a common curve. In other words, the exponent n" in Morrow’s expression (eqn. 2.10) is identical with the cyclic strain-hardening exponent n' (eqn. 2.1). The later modifications of the Morrow’s expression are based on the difference between the exponents n' and n". Nevertheless, the experimental data obtained both in the low-amplitude region and in the high-amplitude region show a good applicability of the original Morrow's expression (eqn. 2.10), in which the exponent n' is replaced by the exponent of the cyclic stress-strain curve n'.
Summarizing both the theoretical calculations and the experimental results, it can be said that the area of the saturation hysteresis loop can be expressed to a first approximation as
where the multiplicative constant, lying roughly between 2 and 3 depends on the material and slightly on the strain amplitude.
Author: Dave Waddell
Company: Computatest
Last edited date:
C. S. Rangan, G. R. Sarma, V. S. V. Mani, Instrumentation Devices and Systems, Second Edition 1983, page 122.
-
Giacobbe, J.B., Selecting and Working Bourdon-Tube Materials. Instrument Manufacturing, July 1952.
-
B. G. Lipták, J. E. Jamison, S. Edvi, Bourdon and Helical Pressure Sensors, Instrument Engineer's Handbook, chapter 5.4, pages 731-734.
-
Goitein. K., A Dimensional Analysis Approach to Bourdon Tube Design. Instrumentation Practice. September 1952.
-
Gillum. D., Industrial Pressure. Level, and Density Measurement. Research Triangle Park, NC. ISA Press, 1995.
-
Hall. J., Monitoring Pressure with Newer Technologies. Instruments and Control Systems. April 1979.
-
Hughes. T.A., Pressure Measurement. EMC series, downloadable PDF. Instrumentation, Systems, and Automation Society. Research Triangle Park, NC. 2002.
-
Feltner C.E., Morrow J.D. Microplastic strain hysteresis energy as a criterion for fatigue fracture. Trans. ASME D. 1961. Vol. 83. N 1. Pages 15-22.
-
Mirko Klesnil, Petr Lukáš Fatigue of Metallic Materials, Volume 71. Pages 30-35.
-
Georg Masing, Wilhelm Mauksch Eigenspannungen und Verfestigung des plastisch gedehnten und gestauchten Messings 1925 pp 244-256.
Appendix
Special Metals Ni-Span-C® Alloy 902 |
|||||
Categories: |
|||||
Material Notes: |
A nickel-iron-chromium alloy made precipitation hardenable by additions of aluminum and titanium. The titanium content also helps provide a controllable thermoelastic coefficient, which is the alloy's outstanding characteristic. The alloy can be processed to have a constant modulus of elasticity at temperatures from -50°F to 150°F (-45 to 65°C). Used for precision springs, mechanical resonators, and other precision elastic components. Standard product forms are round, strip, tube, pipe, and wire. Data provided by the manufacturer, Special Metals. |
||||
Key Words: |
Ni Span C 902, Nispan C, UNS N09902; BS 3127; SAE AMS 5210, 5221, 5223, 5225 |
||||
Vendors: |
ALLOY WIRE INTERNATIONAL is known globally for the ability to process both large and small (2lb Minimum) quantities of nickel alloy wire. Sizes range from 0.001" to 0.827" and are available in round, flat, square, and other profiles. Our superior quality wire is used extensively in springs and components for the aerospace, nuclear, medical and chemical processing industries. Contact us TOLL FREE at 1-866-482-5569 or FAX 401-384-6757 in North America or visit www.alloywire.com for further technical information and other Worldwide Representatives. |
||||
Physical Properties |
Metric |
English |
Comments |
||
Density |
8.05 g/cc |
0.291 lb/in³ |
|||
Mechanical Properties |
Metric |
English |
Comments |
||
Tensile Strength, Ultimate |
1210 MPa |
175000 psi |
Precipitation Hardened |
||
Tensile Strength, Yield |
760 MPa @Strain 0.200 % |
110000 psi @Strain 0.200 % |
Precipitation Hardened |
||
Elongation at Break |
25 % |
25 % |
Precipitation Hardened |
||
Modulus of Elasticity |
|||||
Shear Modulus |
|||||
Electrical Properties |
Metric |
English |
Comments |
||
Electrical Resistivity |
0.000102 ohm-cm |
0.000102 ohm-cm |
|||
Curie Temperature |
190 °C |
374 °F |
|||
Thermal Properties |
Metric |
English |
Comments |
||
CTE, linear |
7.60 µm/m-°C @Temperature 20.0-100 °C |
4.22 µin/in-°F @Temperature 68.0-212 °F |
|||
Specific Heat Capacity |
0.500 J/g-°C |
0.120 BTU/lb-°F |
|||
Thermal Conductivity |
12.1 W/m-K |
84.0 BTU-in/hr-ft²-°F |
|||
Melting Point |
|||||
Solidus |
1450 °C |
2640 °F |
Creep does not occur until the temperature ~>0.5 of the solidus i.e. 1320°F (715°C). | ||
Liquidus |
1480 °C |
2700 °F |
|||
Component Elements Properties |
Metric |
English |
Comments |
||
Aluminum, Al |
0.30 0.80 % |
0.30 0.80 % |
|||
Carbon, C |
<= 0.060 % |
<= 0.060 % |
|||
Chromium, Cr |
4.9 5.75 % |
4.9 5.75 % |
|||
Iron, Fe |
47 % |
47 % |
As remainder |
||
Manganese, Mn |
<= 0.80 % |
<= 0.80 % |
|||
Nickel, Ni |
41 43.5 % |
41 43.5 % |
Including Cobalt |
||
Phosphorous, P |
<= 0.040 % |
<= 0.040 % |
|||
Silicon, Si |
<= 1.0 % |
<= 1.0 % |
|||
Sulfur, S |
<= 0.040 % |
<= 0.040 % |
|||
Titanium, Ti |
2.2 2.75 % |
2.2 2.75 % |
|||